

By Zach Wennstedt, owner of Aging Safely Baths. Selling and installing walk in tubs and roll in showers in all 50 states since 2012; formerly sales manager for multi-million-dollar plumbing and national remodeling companies. Updated October 2026. Not legal, medical or benefits advice; program rules change, so confirm with the agency named.
The install is the part nobody shows you. The brochure has the tub, the website has the price, and then there is a day when a crew is in your bathroom with the old tub on the lawn and you are hoping you made the right call. This is that day, hour by hour, the way it actually goes in a typical single-family home, from the installer who has scheduled thousands of them. It covers what the crew does, what you should have ready, where the surprises hide, what "one day" really means, and the checklist we hand every homeowner before the crew leaves.
A standard walk in tub or roll in shower install in an existing alcove takes one working day, roughly 7 am to 4 pm, with two installers. Morning: protect the house, remove the old tub, open the plumbing, run the electrical. Midday: set and level the new unit, connect drain and supply, pressure-test. Afternoon: wall panels, caulk, fixtures, a 20-minute fill test with the door closed, cleanup, walkthrough. Two-day jobs happen when a floor needs repair, a subfloor has rot, a water heater or electrical panel upgrade is part of the scope, or the bathroom is a full remodel rather than a swap.
Before the day: what we have already done
- Measured from your photos and your tape measure, confirmed the alcove, the door swing side, and the drain location (left, right or center).
- Checked the water heater and the panel space on the quote; if either needed work, your plumber or electrician did it the week before, or we scheduled it into day one.
- Had the tub or shower shipped to the crew, not the curb, so nothing sits in your driveway. We open the crate the day before and inspect it.
- Pulled the permit where the municipality requires one; most do for a plumbing fixture change, and it is on the itemized quote as a line, not a surprise.
- Sent you the prep list below.
Your prep list, the night before
- Clear the bathroom of everything that is not bolted down: rugs, shelves, the contents of the vanity top, the shower curtain, towels.
- Clear a path from the front door to the bathroom. The old tub comes out that way and the new one goes in; a 30 x 60 walk in tub is about 300 pounds in the crate.
- Move cars so the crew can park near the door.
- Confirm where the water shutoff is. If you do not know, we will find it, but knowing saves ten minutes.
- Decide who is home. One adult who can answer questions is ideal; the bather does not need to be there until the walkthrough.
- Pets in a closed room. Tools and open doors do not mix with dogs.
- If the bathroom is the only one in the house, plan for it to be unavailable from 7 am to about 3 pm. We leave a toilet usable whenever we can, and we tell you if we cannot.
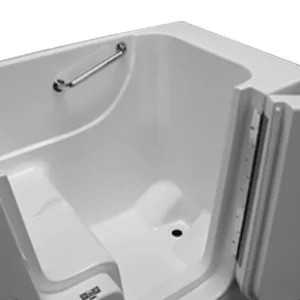
7:00 am. Arrival and protection
Two installers, one truck, one trailer with the unit. The lead walks the route with you, then the crew lays runners from the door to the bathroom, masks the vanity and toilet, and covers the floor. Thirty minutes that save a thousand dollars of scuffed hardwood. They shut off the water to the bathroom, or the house if the bathroom has no isolation valves, and drain the lines.
7:45 am. The old tub comes out
A cast iron tub is broken up in place with a sledge (loud; we warn the neighbors), a steel or fiberglass tub is cut and carried. The surround comes off: tile is chipped to the studs in the alcove only, fiberglass surrounds are cut and removed in pieces. The faucet, spout and drain are disconnected. By 9 am the alcove is open to the studs, and this is the moment the crew learns what the house is hiding.
The surprises, and what each one costs
| What we find | How often | What it means |
|---|---|---|
| Soft or rotted subfloor at the drain | 1 in 8 homes, more in older ones | Cut out and replace the section; 1 to 2 hours and $150 to $400 in materials, on the change order |
| Galvanized or lead supply lines | Older homes | Replace to the nearest copper or PEX; usually under $300 |
| Drain in the wrong spot for the new unit | Rare, we check first | Reroute the trap; 1 hour |
| Mold behind the surround | 1 in 10 | Treat, dry, replace affected drywall with cement board; adds an hour or two |
| Studs out of plumb or a bowed wall | Common in pre-1970 homes | Shim and fur the wall so the panels sit flat; included |
| No GFCI circuit nearby for the pumps | Most homes | We run it from the panel; included up to 25 feet |
Every one of these is handled on the spot, with a photo and a price before any extra work starts. The typical change-order total across all our installs is zero; when there is one, it averages a few hundred dollars for a subfloor patch.
9:00 am. Plumbing and electrical rough-in
The drain is set to the new unit's location with a new trap. Supply lines are brought up to the faucet height, which on a walk in tub is on the deck, not the wall. If the quote includes a fast-fill faucet or a handheld wand, the lines are sized for it. The electrician on the crew runs dedicated GFCI circuits for the heated seat, the air blower, the water pump and the inline heater, one per motor, to the panel. For a roll in shower the plumbing is simpler and the electrical is usually just a light and fan if you add them.
10:30 am. Setting the unit
The tub comes in on a dolly, out of the crate, and is dry-fit in the alcove. The crew checks the door swing, the deck height against the wall, and the clearances. A Hydro Dimensions tub sits on adjustable leveling feet on a mortar bed where the factory spec calls for one; an Ella or Meditub sits on its frame. Leveling is the single most important twenty minutes of the day: a tub a quarter inch out of level is a door that weeps. The lead levels it across the width and the length and checks that the door meets the gasket evenly all the way around before anything is connected. A roll in shower pan is set in a bed of mortar, leveled to a slight fall toward the drain, and left to set while the crew works on the walls.
11:30 am. Connections and the first pressure test
Drain and overflow connected. Supply lines connected to the deck faucet. Pumps and heaters plugged into their circuits and tested dry (a water pump is never run dry for more than a second). Water turned back on. The crew runs the faucet and the wand, checks every joint for drips, and fills the tub a few inches to test the drain. Lunch is usually here, eaten in the truck.
12:30 pm. Walls, panels and finish
The wet-area wall panels go up: three-piece acrylic or Crestline panels for a tub, the shower's own wall system for a roll in shower. Panels are cut around the faucet and the grab bars, glued and screwed into the studs through flanges, and the seams are caulked with 100% silicone. Grab bars are anchored into studs or blocking, not into panel alone, and we add blocking during the rough-in for any bar you may want later. The shower or tub door is hung, the escutcheons go on, the trim is set, and the floor is patched where the old tub's footprint was larger than the new one.
2:30 pm. The fill test
Door closed, tub filled to the overflow, timer set for 20 minutes. The crew checks the door seal, the drain, the overflow and every joint below the deck. Then they run every system: heated seat warm, air jets, water jets, inline heater holding temperature, lights if fitted, the wand. Then they drain it and time the drain. This test is written on the leak-protection guarantee and it is why door leaks are almost nonexistent on our installs. A roll in shower gets its own test: pan flooded, drain timed, walls sprayed with the wand and checked at the seams.
3:15 pm. Cleanup and the walkthrough
Runners up, dust vacuumed, the old tub and debris on the trailer. Then the walkthrough, with the bather if they are able: how the door latches and unlatches, how to fill with the door closed, how to set the anti-scald limit, how each pump works, how to run the jet-clean cycle, how to wipe the gasket. We leave the manuals, the warranty registration, the factory schematic, and our service number. We take photos for the warranty file and for any grant or waiver that funded the job. Most crews are out between 3:30 and 4:30.
What "one day" does and does not include
| Included in a one-day install | Not included, quoted separately if needed |
|---|---|
| Removal and haul-away of the old tub and surround | Water heater replacement |
| New drain, trap, supply lines in the alcove | Electrical panel upgrade |
| Dedicated GFCI circuits, up to 25 feet each | Moving plumbing to a different wall |
| Setting, leveling, connecting the new unit | Floor tile outside the alcove footprint |
| Wall panels in the wet area | Full bathroom remodel (vanity, toilet, flooring) |
| Grab bars and blocking | Widening a doorway for a wheelchair |
| Fill test, cleanup, walkthrough | Permit fees above the quoted line |
Roll in shower install: what changes
A roll in shower is often faster than a tub because there is no deck plumbing and less electrical, but the floor matters more. The pan has to sit on a sound subfloor with a slight fall to the drain, and a zero-threshold pan sometimes requires recessing the subfloor by an inch or two so the pan sits flush with the bathroom floor. We check for that from your photos, and a recessed install adds an hour. Wall panels run to the ceiling or to 80 inches, a fold-up seat is anchored into blocking, and the curtain rod or glass goes up last. The roll in shower guide covers sizes and thresholds.
Two-day installs, honestly
About one job in six runs into day two, and we tell you at the quote if yours is likely to. The causes: a subfloor that needs replacement over a large area, a water heater or panel upgrade scheduled into the job, a bathroom with a window in the wet wall that needs a new surround and trim, a tub shower combo with full-height wall panels and a rain head, or a wheelchair bathroom with a widened door. Day two is usually a half day. Nobody leaves your bathroom unusable overnight without telling you in the morning.
Supply-only: if your own plumber installs
Plenty of customers have a plumber they trust. We ship the unit to the house, send the factory schematic and the install spec, and give your plumber free tech support by phone during the install, including the leveling and the fill test. The factory warranty is the same. The things your plumber should know in advance: the unit needs a dedicated circuit per motor, the door must be checked for even gasket contact after leveling, and the fill test with the door closed is not optional. Our tub guide and each product page carry the schematic.
After the crew leaves: the first week
- Let the caulk cure 24 hours before the first bath.
- First bath: fill with the door closed, check the floor around the tub afterward. Dry means dry.
- Set the bathroom up for the bather: towel within reach of the seat, wand hung low, night light.
- Register the warranty online with the serial number from the manual packet.
- Call us with anything odd. A door that needs a half turn on a leveling foot after the house settles is a ten-minute visit, and it is covered.
Questions homeowners ask on install day
- Can I use the toilet? Usually yes all day; we tell you the exception in the morning.
- Will it be loud? Breaking a cast iron tub is loud for about fifteen minutes. The rest is normal construction noise.
- Do I need to be home? One adult at the start and for the walkthrough. Running errands midday is fine.
- What if the tub is damaged in shipping? We inspect the day before; if a replacement is needed the install moves, it does not proceed with a damaged unit.
- Will you match my tile? We patch the floor inside the old footprint and trim the edge; matching tile outside the alcove is a remodel item we quote separately.
- What happens to the old tub? Hauled away and recycled; cast iron goes to scrap.
Why the day goes this way
Every step above exists because of a service call we took in the first few years: the mortar bed because a tub rocked, the blocking because a grab bar pulled out of a panel, the 20-minute fill test because a door wept at a corner, the day-before inspection because a crate arrived cracked. A crew that follows the order does not generate those calls. That is what factory-certified means on our installer page, and it is what the white glove line item buys. The quote is itemized, the install is a day, and the walkthrough is where you learn to use the thing you waited for.
Grab bars, controls and the details set on the day
The difference between a bathroom that is safe and one that merely has a walk in tub is a handful of measurements the crew sets with the bather in mind. Grab bars go at 33 to 36 inches to the top of the bar on the entry side, with a vertical bar beside the door for the step and a horizontal bar beside the seat for standing up, both anchored into blocking. The faucet and the wand holder go where the seated bather can reach them without twisting; for a stroke survivor that means the strong side, which we confirm in the morning. The anti-scald limit is set to 104°F before the walkthrough. Towel hooks go at seated reach, not at standing height. A roll in shower gets its fold-up seat at 17 to 19 inches, the controls on the wall opposite the seat within arm's reach, and the wand on a slide bar the seated bather can adjust. None of this costs extra; all of it is why the walkthrough happens with the bather present whenever possible.
Tub shower combo: the longer afternoon
A walk in tub shower combo adds a full-height wall system, a rain head or standard shower head on a riser, a diverter, and a curtain or glass enclosure. The morning is identical; the afternoon runs two to three hours longer because the panels go to the ceiling and the shower valve is set in the wall rather than on the deck. Plan on the crew leaving closer to 6 pm, or on a short second morning for the enclosure.
Manufactured and mobile homes
Common for us, and a little different. The floor is usually particleboard over joists on 16 or 24 inch centers, so the crew checks deflection and often adds a plywood sub-layer under the tub's footprint. Supply lines are typically PEX, which is easy; drains run under the home and the crew needs access to the belly, which means a skirt panel comes off. The alcove is frequently 54 inches rather than 60, which is why the compact 26 x 46 and 28 x 52 tubs and the 54-inch shower pans exist. Add an hour for the floor; otherwise it is a one-day job.
Condos, apartments and HOAs
Three things to settle before the day: building access (freight elevator reservation, work hours, protection requirements in common hallways), the water shutoff (many buildings have no in-unit isolation valves and require the building engineer to shut a riser, which must be scheduled and announced to neighbors), and the HOA's approval for a plumbing fixture change. We handle the paperwork with you in advance; on the day the crew follows the building's protection rules and the shutoff window. A second-floor unit with a slab floor may limit how far the drain can move, which we confirm from photos.
Second-floor bathrooms
The crate comes up the stairs on a stair-climbing dolly with two installers; a 30 x 60 tub fits most straight staircases and most landings. Turns and low ceilings are the question, and we ask for a photo of the stairs with the quote. Weight is not an issue for a wood-framed floor in good condition; a filled walk in tub with a bather weighs about the same as a filled standard tub, and the frame spreads the load across the joists.
Winter installs and cold climates
Installs happen all winter in every state. Two adjustments: the crew keeps the front door closed between trips and uses a plastic zip wall at the bathroom door to hold heat, and caulk and mortar need a warm room to cure, so the bathroom heat stays on overnight. In a home with a crawlspace, the drain and supply lines under the bathroom are checked for insulation while the floor is open, since a walk in tub pulls more hot water than the old tub did and an uninsulated run wastes the first gallons.
How a nationwide install is scheduled
We sell and install in all 50 states, so the crew in your area is a factory-certified independent installer we have worked with, or one of our own teams on a route. The sequence: the unit ships from the factory to the installer, the installer confirms receipt and inspects it, we set the date with you, and you get the installer's name and phone number before the day. Lead time from order to install runs two to four weeks for stock models and six to eight for custom sizes or colors. If your area is remote, the installer may travel in the night before; that is in the quote as travel, not added later. Our locations page shows coverage by state and ZIP.
The itemized quote, read against the day
| Quote line | What it buys on install day |
|---|---|
| Walk in tub or roll in shower, model and options | The unit, inspected the day before |
| Demolition and haul-away | 7:45 am to 9 am; the old tub leaves on the trailer |
| Plumbing: drain, trap, supply, faucet connection | 9 am rough-in and 11:30 am connections |
| Electrical: dedicated GFCI circuits, up to 25 ft each | One per motor, run during rough-in |
| Wall panels and caulk | The afternoon |
| Grab bars and blocking | Blocking during rough-in, bars at finish |
| Leveling, fill test, walkthrough | 10:30 am leveling; 2:30 pm fill test; 3:15 pm walkthrough |
| Permit | Pulled before the day where required |
| Travel (remote areas only) | The installer's night before |
If a line is missing from a competitor's quote, ask what happens to that step on the day. The cost guide shows the full itemization with 2026 prices; the shower install cost page does the same for roll in showers.
What a factory-certified crew carries
- Four-foot and torpedo levels, a laser for the pan fall, shims and a mortar mix sized to the unit.
- Stair-climbing dolly, floor runners, zip wall, dust extraction on the saw.
- Press fittings and PEX for supplies, ABS and PVC for the drain, a new trap for every job.
- GFCI breakers and 12-gauge wire for the pump circuits, a tester for every outlet.
- 100% silicone, panel adhesive, stainless screws, blocking lumber.
- Spare door gasket, spare drain stopper, spare escutcheons, so a shipping scuff does not cost a day.
- The factory schematic for your exact model, printed, and the install spec.
Three install days, as they happened
Omaha, 1962 ranch, Hydro Dimensions 3060. Cast iron tub, tile surround, galvanized supplies. Subfloor soft at the drain; a 2 x 3 foot section replaced, change order $240. Set at 11, fill test at 2:40, out by 4. Phoenix, 2004 two-story, Ella Elite upstairs. Fiberglass tub-shower unit cut out in four pieces, PEX everywhere, no surprises. Crew out at 2:15. Tampa, condo, Bestbath roll in shower. Freight elevator reserved 8 to 10 and 2 to 4, riser shutoff scheduled with the building for 9 to 1. Pan recessed one inch into the slab topping, walls to the ceiling, seat and bars in blocking. Out at 4:30; the building engineer signed off at 4.
If something is not right after the install
Call the number on the walkthrough sheet, not the factory. Most post-install issues are small and fast: a door that needs a leveling-foot adjustment after the house settles (ten minutes), a jet that air-locked on the first fill (run the pump with the tub full for thirty seconds), a wand that drips at the hose connection (a washer). The leak-protection guarantee covers the installation; the factory warranty covers the unit. If a unit defect appears, we handle the factory claim and the service visit, and you do not make a second phone call. Service calls on our installs run well under one per hundred jobs in the first year, and nearly all of them are the leveling adjustment.
A one-page install-day checklist
- Night before: bathroom cleared, path cleared, cars moved, shutoff located, pets planned.
- 7 am: meet the lead, walk the route, confirm the door side and drain location on the schematic.
- Mid-morning: expect noise; be reachable for a change-order question if the floor is soft.
- Midday: confirm toilet access for the afternoon.
- 2:30 pm: watch the fill test if you like; it is the proof.
- 3:15 pm: walkthrough with the bather; set the anti-scald limit together; get the manuals, schematic, warranty and service number.
- Next day: register the warranty; first bath after 24 hours; check the floor is dry.
That is the whole day. If you want it scheduled, the virtual estimate is where it starts, and 1-888-779-2284 answers seven days a week.